Monday, May 26, 2014

Globecraft & PIccolo - Stellar Dressform Altered Notebook

Happy Monday!

Today I have a "Stellar" project to share with you. I am a list maker and always in need of another cute notebook to write the funny things my kids say, project ideas, my to-do list, etc. With a few Accents and some Embossing Enamel, you can have a fun notepad, too!


Here's what you'll need from the shop:

Globecraft & Piccolo supplies:
Vintage Dressforms Accents (A125) - dressform & large flourish

other supplies:
pocket notepad (3"x5")
word sticker (American Crafts)
ribbon, black
tulle, bits of white
script text patterned paper (Bo Bunny)

This is the before shot of the notepad. I love the black and white color scheme. The zebra pattern...not so much. Carefully bend both of the end wires, so you can 'unscrew' the coil from the paper. Hang onto the coil, if you want to use it again.


Trace the cover onto the back of your patterned paper. (I traced the holes and used the small hole on the Crop-a-dile to punch through the paper.) Randomly sprinkle Poodle Skirt and heat. Let cool.


Using the Enamel Powder Adhesive, 'ink' up your dressform and both flourishes. Sprinkle on Micro Black. Heat and repeat at least one more time. (I dipped and heated 3 times.)


Time to put it all together! Twist the coil back into place. Using Glastique, adhere all of the Accents. Adhere ribbon and tulle. Apply word sticker. Done!

These are so quick to make. I have a few more teacher gifts to make and you can be sure these notebooks will be included!

Inky hugs,
Angi


Monday, May 19, 2014

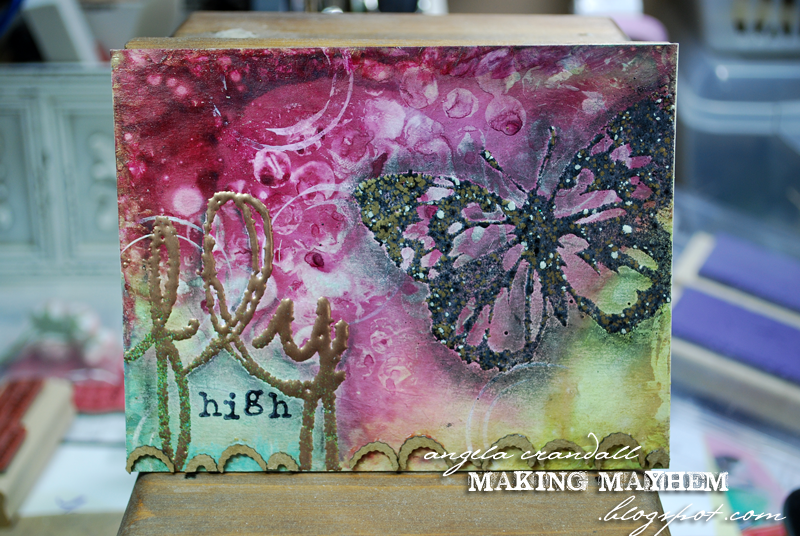
Globecraft & Piccolo - Altered Postcard "Fly" Tutorial

[edited to add: find the how-to video below!]

Happy Monday, Friends!

This week I have a fun project  - an altered postcard using Globecraft & Piccolo Embossing Enamels, Gel and Piccolo Accents. You can use an actual postcard or cut your own bases from cereal boxes, chipboard or even just cardstock. Remember when I suggested you keep all the bits and pieces you weed from the main Piccolo Accents?


(I actually took video while I created this postcard (having some difficulties uploading the video), so keep an eye out for an update to this post and WATCH how this project came together! )

Gather your supplies and watch for the update. You may surprised at how easy this is!


Globecraft & Piccolo supplies:
Enamel Powder Adhesive Fluid
Embossing Enamel Temple Stone
Embossing Enamel Vintage Copper
3D Enamel Gel - Satin Gold
Glastique Gloss
*Leftover bits from French Oval Frame Kit

other supplies:
Distress Ink - Vintage Photo
Archival Ink - Jet Black
Adirondack Color Wash - Cranberry
Tattered Angels Chalk Sprays - Banana Pudding, Peacock
Heidi Swapp Color Shine - Citron
White Gesso or white acrylic paint
Found Items: bubble wrap, tape roll

*you can use any leftover bits from your Piccolo Accents and frames. I save all my bits & pieces in a reclosable baggie and pick through them when I need something.

Here are the basics:

1. Spray colors. Let dry (or use a heat tool to speed it up!)
2. Use Found Items to add interest.
3. Paint edges using 3D Enamel Gel.
4. Emboss butterfly and 'fly' using Embossing Enamels.
5. Stamp 'high'.
6. Distress edges using Vintage Photo.
7. Add Piccolo bits using Glastique. Let dry.

That's it! Don't forget - if you create a project using Globecraft or Piccolo products, we'd love for you to share it on our Facebook page!

Inky hugs,
Angi

Monday, May 12, 2014

Globecraft & Piccolo - Father's Day Card

The wonderful thing about making cards is there is always a reason to make one! There are only five weeks until Father's Day and I have a card to share with you that uses embossing enamels, Piccolos and some fun stamps!


Here's today's Globecraft & Piccolo supply list:
Enamel Powder Adhesive Fluid
Embossing Enamel Vintage Copper
Embossing Enamel Real Rust
Embossing Enamel Aged White
Embossing Enamel Ultra Thick Clear
Piccolo Vintage Lock & Keys Charms (CA124) large key
Piccolo Vintage Lock & Keys Necklace (CA125) small key

Other supplies:
Jar stamp (Little Yellow Bicycle)
Alphabet stamps (Inkadinkadoo)
sentiment stamp (Stampin' Up!)
Grid stamp (Hero Arts)
jump ring
crochet thread
small heart punch
Vintage Photo Distress Ink

Use the Enamel Powder Adhesive to ink up any of the stamps before using the embossing enamel. I used Vintage Copper on the background. Do you see the green 'patina' in the Vintage Copper? I use an old towel to wipe the cardstock after the Vintage Copper to get any extra powder or mica off.


I wanted this card to have a bit of an old homey feel, so I used Real Rust on the heart. Distressed the edges of the heart, the jar label and the white panel using Vintage Photo Distress Ink.


The keys are embossed with the Vintage Copper, too. I only used one layer and dabbed a little Vintage Photo Distress Ink into the unembossed areas.


The cracking was a happy accident! I coated the cardstock stamped image using the Ultra Thick Clear and while I was working on something else, the fussy cut piece fell onto the floor. When I picked it up, I accidentally folded the corner and it cracked! I liked the look, so I bent the cardstock gently and 'broke' the embossed glass jar.

Easy, peasy! I hope that you have found a little inspiration of your own. Would love to see what you!

Inky hugs,
Angi

Monday, May 5, 2014

Globecraft & Piccolo - Hello Darling Embossed Card

Happy Monday!

It's almost time for the Great Lakes Mega Meet in Novi, Michigan (May 8-10)! Will you be attending? Globecraft & Piccolo will be there and will have a DIFFERENT make and take each day! Be sure to stop by the booth to play with our Embossing Enamels, 3D Gels, Piccolos and Globes!

Today I have a card to share with a few fun techniques for you to try. Click the picture and take a closer look at the awesome flower!


Here's what you'll need:

Globecraft & Piccolo Supplies:
Enamel Powder Adhesive Fluid (this should be a given! I do love G&P Enamels!)
Embossing Enamel Platinum
Embossing Enamel Poodle Skirt
Embossing Enamel Ultra Thick Clear
scrap piece of G&P bookboard (this can be any leftover piece)
3D Enamel Gel Coral Pearl
Glastique Glossy
Vintage Corner Flourishes (A157)

Other:
Background stamp (Stampin' Up!)
Flower (Prima)
Sentiment Stamp (Studio G)
Archival Ink Jet Black (Ranger - or any permanent black ink)
Melon Mambo Classic Ink (Stampin' Up!)
Vintage Photo Distress Ink (Ranger)
Rayon Seam Binding, white

Let's get started!
Dab the Adhesive Fluid over the flower petals. Coat with the Ultra Thick Clear Embossing Enamel. I found using a paintbrush works well to get adhesive into all the little nooks and crannies. Repeat until the petals are coated.

Love this.


What a difference! The coated flower looks like vintage plastic. What an easy way to get a different look from your flowers...


Take the Coral Pearl 3D Enamel Gel and scoop a bit out onto a craft mat. Add about the same amount of water (less if you want more color) and mix on the mat. Add the ribbon, smooshing (yes, that's a technical term!) it around until it's saturated. Place on a napkin. You can dry the ribbon with a heat tool (held far away) or a hair dryer. Be careful not to get too close & melt the ribbon!


Here's the ribbon wet:


The ribbon color lightens up when dry. Using the 3D Enamel Gels gives the limp seam binding some body and allows it to keep it's shape without making it difficult to work with.


The background was the usual dab on some adhesive, melt the powder.


Have you been keeping your scrap bits - the small and the large? I keep ALL of mine in a small container. (hint, hint...there may be some future ideas for those tiny pieces of craftiness!)


Edge the scrap piece with the adhesive and sprinkle on some Platinum and a little pinch of Poodle Skirt.

Finish up the card by layering the pieces and then using the Glasstique on top of the Accent pieces.


Whew! Did you try coating your flowers? I wonder what else needs a little updating in the studio... Thanks for stopping by today! See you here tomorrow for more inspiration!

Inky hugs,
Angi